An electronic assembly without an enclosure is not a product — it is a bare board. An enclosure is not just protection from mechanical damage and dust; it is the first thing a user sees and touches, and it communicates the quality and character of the device before anyone switches it on. That is why we approach the enclosure and all surrounding mechanical parts with the same seriousness as the electronics inside.
We manage the entire process internally — from design to finished physical part. If a client comes without a 3D model, we start from scratch: we define the dimensions according to the board and its connectors, determine how the enclosure needs to look and function, construct it in a 3D CAD tool and print it. If the client already has their own 3D model — excellent, we go straight to print. All combinations are welcome.
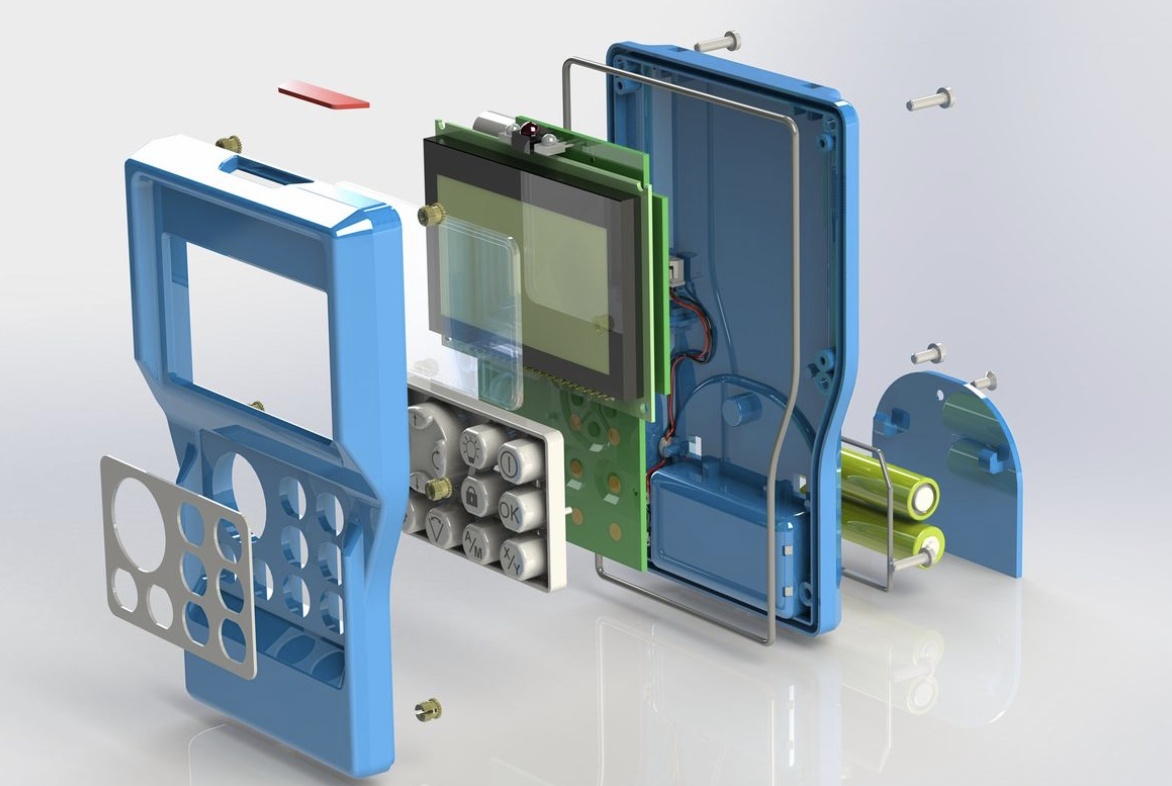
More than a box
An enclosure is rarely just a box with a lid. Around it comes an entire ecosystem of mechanical parts that make the device functional and pleasant to use. Buttons that click satisfyingly and return reliably to position. Light guides that carry LED indicator light from the board to the outer enclosure surface — precisely, without scatter. Fixators and brackets that hold the board at an exactly defined position inside the enclosure without any movement. Covers, ventilation grilles, cable guides — everything the device needs to be not just correct, but complete.
Each of these parts is designed with assembly, material and function in mind. A button that looks good on screen but has an unpleasant travel or does not return reliably to position — is not a good button. A light guide that leaks light in the wrong places — is not a good light guide. Function and aesthetics are not in conflict; both are requirements.

Multicolour printing and branding
Our printers support multicolour printing — and that opens up possibilities that plastic injection moulding cannot offer without expensive tooling and large volumes. A logo or product name can be printed directly onto the enclosure in a colour that differs from the base enclosure colour — without stickers, without subsequent painting, without screen printing. The logo is part of the material itself, permanent and resilient.
For an even more striking effect, the logo or product name can be made from semi-translucent or transparent material embedded in an otherwise opaque enclosure. A LED placed behind such a logo suddenly gives the enclosure a character that cannot be bought off the shelf. Ambient lighting, a status indicator that glows through the logo, backlit product name — all of these are effects that set a finished product apart from the competition and give it a professional, industrial appearance.
From prototype to series
Just as with electronics, 3D printed enclosures go through a prototype and series phase. The enclosure prototype is printed alongside the electronics prototype — fit, ergonomics, aesthetics and accessibility of all elements are verified. Changes at this stage are fast and inexpensive; we modify the CAD model and print a new part. Once the client is satisfied, the same model goes into series production on our printer farm — consistently, unit by unit, with the same dimensions and the same surface quality.
The result is a complete device that comes from one place — electronics, firmware and enclosure together, verified as a whole, ready for the end user.